Friday, March 26, 2010

Built-in Charting Controls (VS 2010 and .NET 4 Series)

This is the fifteenth in a series of blog posts I’m doing on the upcoming VS 2010 and .NET 4 release. Today’s post covers a nice addition to ASP.NET and Windows Forms with .NET 4 - built-in charting control support.

ASP.NET and Windows Forms Charting Controls

A little over 14 months ago I blogged about how Microsoft was making available a free download of charting controls for both ASP.NET 3.5 and Windows Forms 3.5.

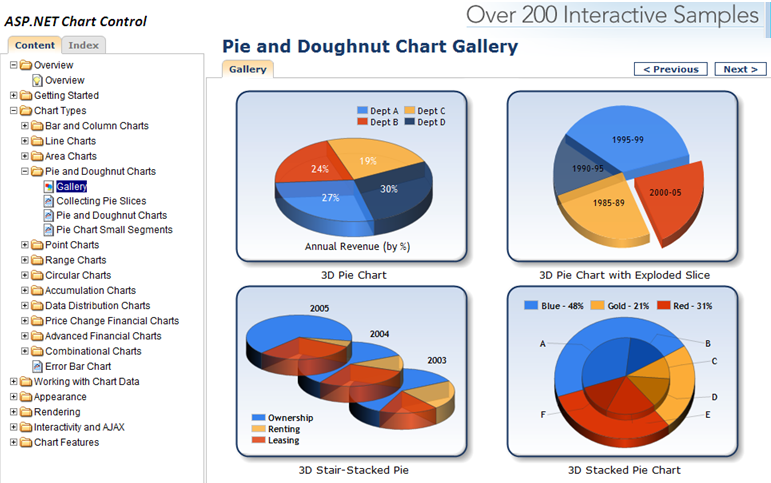
You can download and use these runtime controls for free within your web and client applications today. You can also download VS 2008 tooling support for them. They provide a rich set of charting capabilities that is easy to use. To get a sense of what all you can do with them, I recommend downloading the ASP.NET and Windows Forms sample projects which provide more than 200 samples within them. Below is a screen-shot of some pie and doughnut chart samples from the ASP.NET sample application:

image

Charting Controls Now Built-into .NET 4

With .NET 3.5 you had to separately download the chart controls and add them into your application. With .NET 4 these controls are now built-into ASP.NET 4 and Windows Forms 4 – which means you can immediately take advantage of them out of the box (no separate download or registration required).

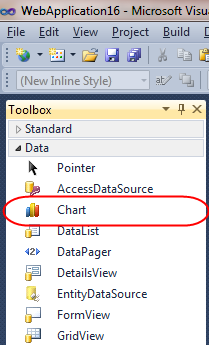
Within ASP.NET 4 applications you’ll find that there is now a new built-in control within the “Data” tab of the Toolbox:

image

You can use this control without having to register or wire-up any configuration file entries. All of the charting control configuration is now pre-registered with ASP.NET 4 (meaning nothing has to be added to an application’s web.config file for them to work). This enables you to maintain very clean and minimal Web.config files.

URL Routing with ASP.NET 4 Web Forms (VS 2010 and .NET 4.0 Series)


This is the eighth in a series of blog posts I’m doing on the upcoming VS 2010 and .NET 4 release. Today’s post covers a cool new runtime feature in ASP.NET 4 – which is the ability to use URL routing with Web Forms based pages.

What is URL Routing?

URL routing was a capability we first introduced with ASP.NET 3.5 SP1, and which is already used within ASP.NET MVC applications to expose clean, SEO-friendly “web 2.0” URLs. URL routing lets you configure an application to accept request URLs that do not map to physical files. Instead, you can use routing to define URLs that are semantically meaningful to users and that can help with search-engine optimization (SEO).

For example, the URL for a traditional page that displays product categories might look like below:

http://www.mysite.com/products.aspx?category=software

Using the URL routing engine in ASP.NET 4 you can now configure the application to accept the following URL instead to render the same information:

http://www.mysite.com/products/software

With ASP.NET 4.0, URLs like above can now be mapped to both ASP.NET MVC Controller classes, as well as ASP.NET Web Forms based pages.

Mapping URLs using ASP.NET MVC

The URL Routing engine introduced with ASP.NET 3.5 SP1 provides a powerful way to handle incoming URLs. Typically you write code as part of application startup to register/map URLs that match a specific URL format to code handlers.

Below is an example of how you can use ASP.NET MVC today to map the /products/software URL to a controller class called “Products” that has an action method named “Browse”:

step1

The first “products-browse” parameter to the MapRoute() helper method above is a friendly name for the route. The second “products/{category}” parameter is the URL filter that matches the /products/software URL – and which treats the second segment of the URL as a parameter value called “category”. This parameter will then be passed to the ProductsController’s Browse() action method to process.

Mapping URLs using ASP.NET Web Forms

ASP.NET 4.0 now allows you to also use the URL Routing engine to map URLs to ASP.NET Web Forms pages as well as ASP.NET MVC Controllers.

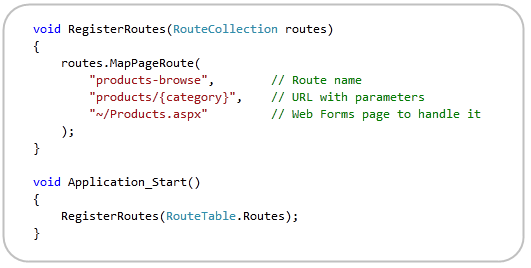
Below is an example of how you can use the new MapPageRoute() helper method in ASP.NET 4.0 to map the /products/software URL to a “Products.aspx” page that lives immediately under the application root directory:

step2

The first two parameters to the MapPageRoute() helper are the same as in MapRoute(). The first parameter provides a friendly name for the route, and the second specifies the URL format to match. The third parameter, though, points to a Products.aspx page to handle the URL instead of a controller class. You can optionally specify additional parameters to MapPageRoute() that take advantage of features like “route constraints” and provide “default values for parameters” just like you can with ASP.NET MVC based route registrations.

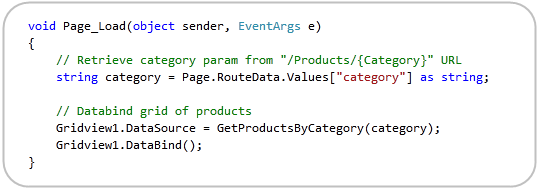
Within the Products.aspx page you can then write code like below that uses the new Page.RouteData property in ASP.NET 4.0 to retrieve the “category” parameter value mapped using the /products/{category} URL filter, and then databind the category products to display them:

step3

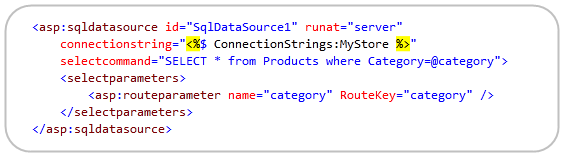
In addition to programmatically accessing incoming route parameters using code like above, you can also take advantage of the new declarative control with any ASP.NET DataSource control to declaratively bind a value from a route as well. For example, below we are using a statement to bind the select statement’s @category parameter from the /products/{category} parameter in the URL route:

step4

Retrieving URLs within an ASP.NET Web Form

The URL routing engine in ASP.NET can be used to both map incoming URLs to code handlers, as well as be used to programmatically generate outgoing URLs using the same mapping registration logic.

For example, above when we mapped the /products/{category} URL we gave it a “friendly name” of “products-browse”. This allows us to now also use the newPage.GetRouteUrl() helper method to lookup the route within the URL routing system, optionally specify parameters to it, and then retrieve an actual URL that it maps back to. For example, the below code would retrieve a URL value of “/products/software”:

step6

You can access the above helper method within either your code-behind file or within your .aspx markup.

There is also now a Response.RedirectToRoute() set of methods that you can use to redirect users to a route (regardless of whether it is a MVC or Web Forms handled one) and optionally pass parameters to it.

Handling PostBack Scenarios

URL Routing with ASP.NET 4.0 fully supports postback scenarios. The

control will automatically emit the same URL that caused the page to be rendered. For example, if you access a page with a /products/software URL then any server-side control within it would render out a HTML element back to the client – which means that any postback scenarios that happen on the page will preserve the original URL.

This makes supporting clean, SEO friendly, URLs easy with Web Forms and postback scenarios – and avoids some of the tricks people need to use today when using URL rewriting modules to achieve similar effects.

Summary

ASP.NET 4.0 makes it easy to implement clean, SEO friendly, URLs using both ASP.NET MVC and now ASP.NET Web Forms (you can also have applications that mix the two).

The URL routing engine makes it easy to register URLs of any shape or format and map them to any handler you want. Because the URL routing engine can be used for both mapping incoming URLs as well as generating outgoing URLs, you can at a later point change the URL mappings and not have to modify any page or controller specific code to reflect them – which makes building SEO optimized applications much easier.

Searching and Navigating Code in VS 2010 (VS 2010 and .NET 4.0 Series)

This is the ninth in a series of blog posts I’m doing on the upcoming VS 2010 and .NET 4 release. In today’s blog post I’m going to cover some of the new code searching and navigation features that are now built-into VS 2010.

Searching and Navigating code

Developers need to be able to easily navigate, search and understand the code-base they are working on. In usability studies we’ve done, we typically find that developers spend more time reading, reviewing and searching existing code than actually writing new code.

The VS 2010 code editor adds some nice new features that allow you to more productively search and navigate a code-base, and enable you to more easily understand how code is being used within a solution.

Searching and Navigating the ASP.NET MVC Source Code

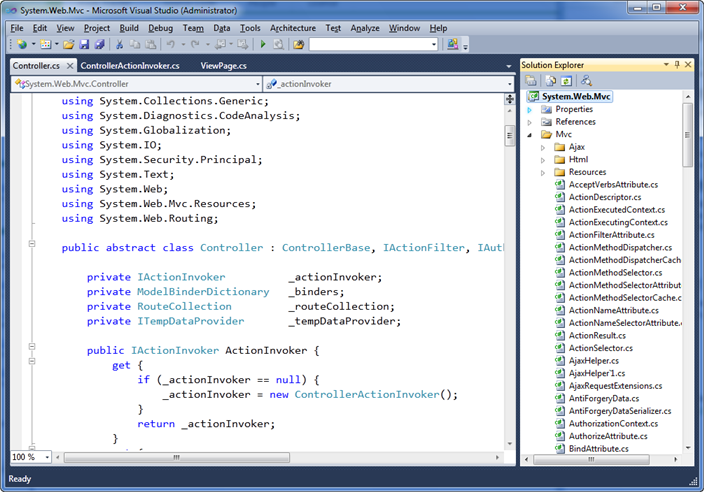
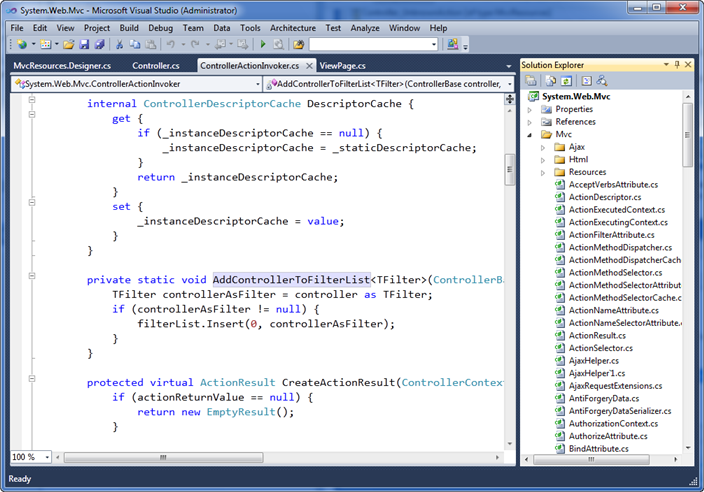
For this blog post I’m going to use the ASP.NET MVC framework code-base (which has many thousand lines of code) to help demonstrate some of the new VS 2010 searching and navigation features. If you have VS 2010 Beta 2 installed, you can follow along by downloading and opening the ASP.NET MVC framework source code from here.

image

You should find that the performance of the below features is really fast with this project – despite it being many thousands of lines of code in size. All of the features I’m demonstrating below are also now built-into VS 2010 (and work for all project types and for both VB and C#).

VS 2010 “Navigate To” Support

Being able to quickly find and navigate code is important with both big and small solutions.

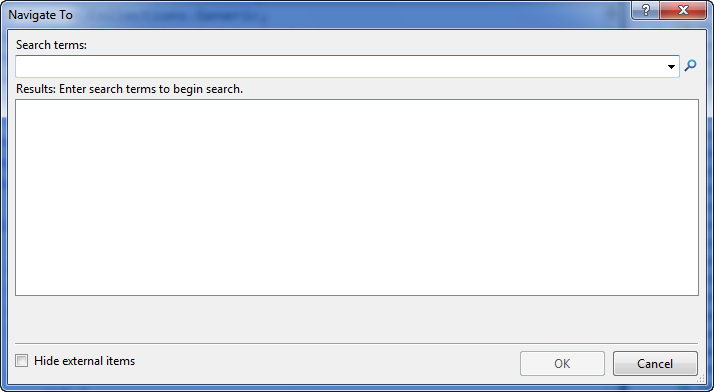
Visual Studio 2010 now supports a new (Ctrl+comma) keyboard shortcut (meaning the control key is held down together with the comma key). When you press the (Ctrl+comma) combination, a new VS 2010 “Navigate To” dialog will appear that allows you to quickly search for types, files, variables and members within your solution – and then open and navigate to them:

image

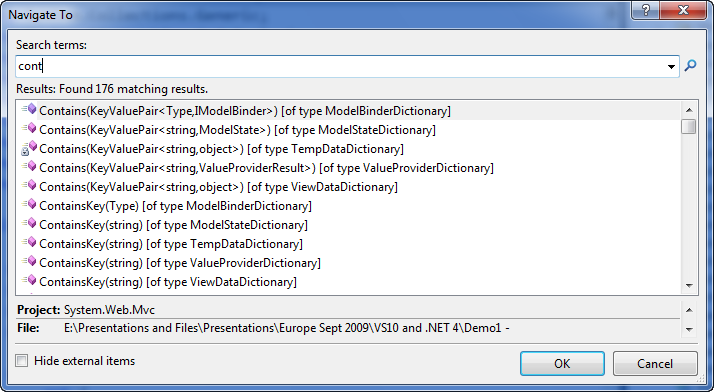
The “Navigate To” dialog provides an fast incremental search UI – with results immediately populating as soon as you start typing search terms. For example, type “cont” (without pressing enter) and you’ll see that 176 results immediately show up within the results list as you start to type:

image

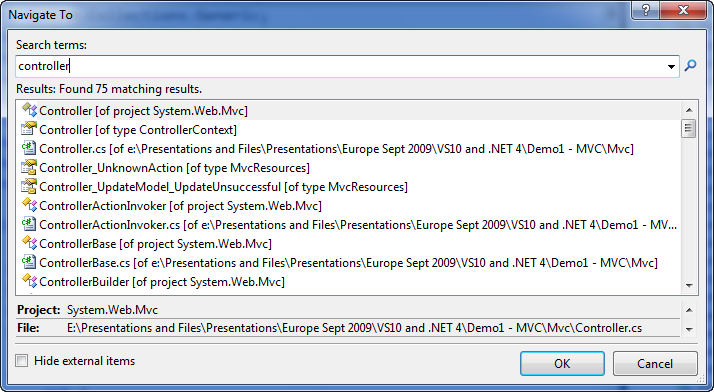
Type a few more characters and you’ll see the list automatically filters to just those results that match “controller”:

image

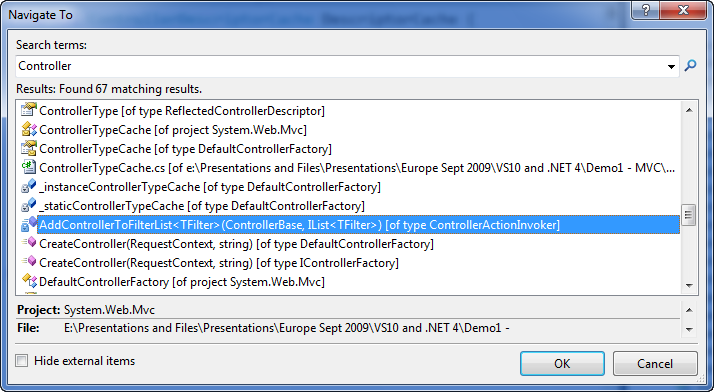
You can use the scroll bar to scroll through the results – or alternatively press the tab key and then use the cursor arrows if you don’t want to take your hands off the keyboard. You’ll find that the “Navigate To” window lists all types of results that match your search term – including Type names, Method/Property names, Field declarations, and file names:

image

Selecting any of the results in the results list will open the relevant source file within VS 2010 (if it isn’t already open) and take you immediately to the relevant source location (and highlight the relevant name within it):

image

Nice Fuzzy Search Capabilities

The “Navigate To” search box supports some nice “fuzzy search” capabilities that allow you to perform smart filters and searches without having to know exactly the name of the thing you are looking for. These work well with the incremental/immediate search UI of the dialog – and allow you to refine your searches and get real-time results as you type.

To try this out let’s first search on the word “cache”. Notice how the search results include not just items that start with the word “cache” – but also display any results that have the word “cache” in it:

image

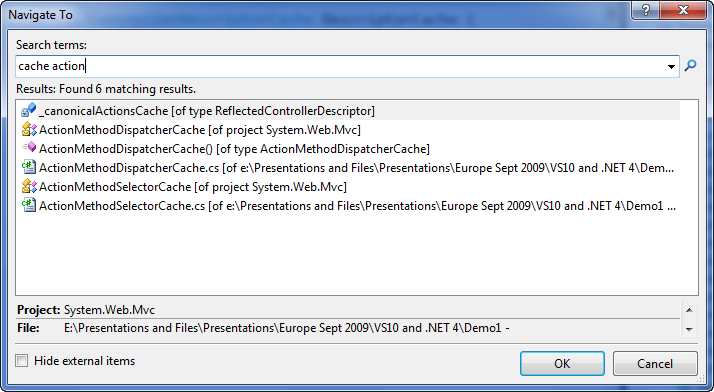
We can add multiple words to the search textbox to further filter the results. For example, below I am filtering the list to only include those that have both “cache”and “action” in the name:

image

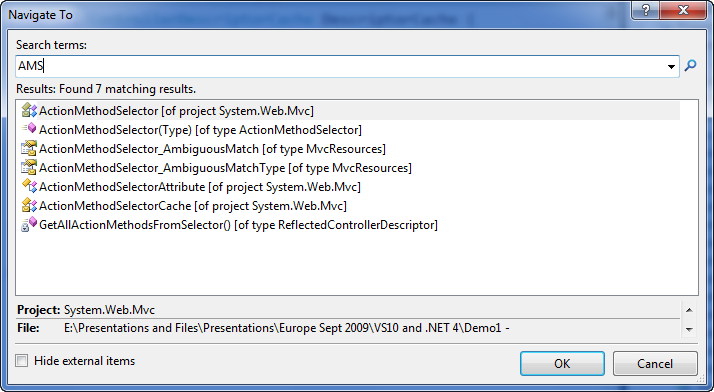
Types and members within the .NET Framework using a naming design-guideline pattern called “Pascal Casing” – which means that the first letter of each word in a Type or Member name is capitalized. The “Navigate To” dialog allows you to optionally use this “Pascal Casing” convention to quickly filter types. Just type the uppercase first letter of names in a type/member and it will automatically filter for results that match the uppercase pascal naming convention.

For example, typing “AMS” will filter to the below results (just those types and members that have words in them that start with A then M then S):

image

The “Navigate To” dialog allows you to quickly filter and locate code with a minimum of keystrokes – and avoid you ever having to use the mouse, open the solution explorer, and click on a file directly.

View Call Hierarchy

Having the ability to quickly search and navigate to code is great. Being able to also quickly discover how that code is being used is even better. VS 2010 introduces a new “View Call Hierarchy” feature that allows you to quickly discover where a particular method or property within your code-base is being called from, and allows you to quickly traverse the call tree graph throughout the code-base (without having to run or debug the solution).

To use this feature, simply select a method or property name within your code-base, and then either type the (Ctrl+K,Ctrl+T) keyboard shortcut combination, or right-click and select the “View Call Hierarchy” context menu command:

image

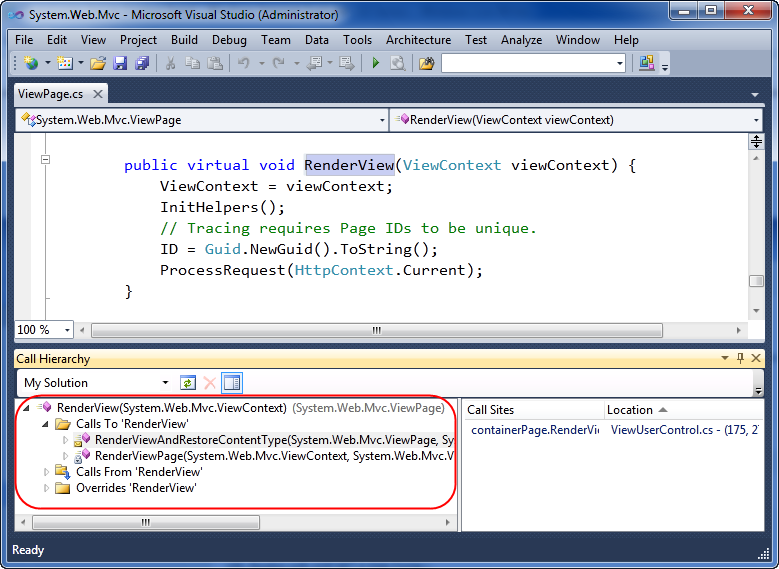
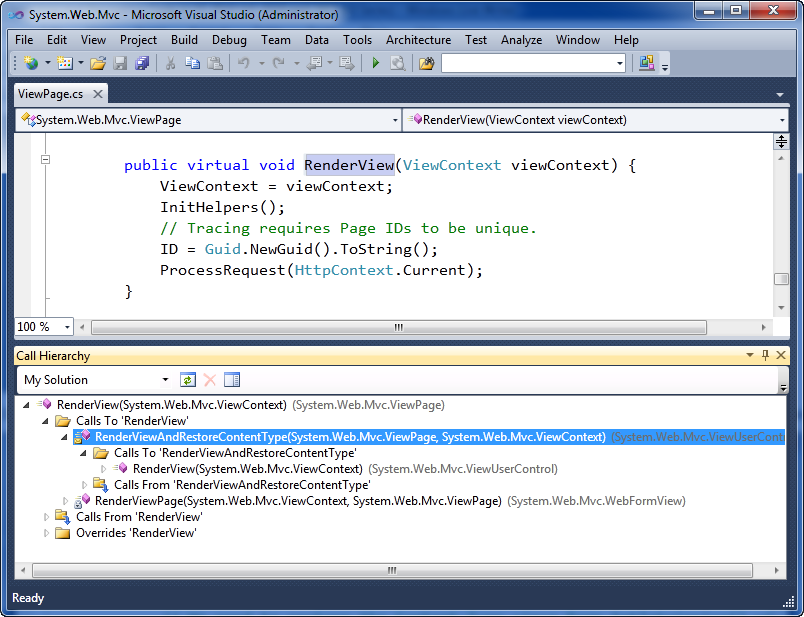
This will bring up a new “Call Hierarchy” tool window that by default shows up under the code editor. Below you can see how the “Call Hierarchy” window is displaying the two methods within our solution that invoke the ViewPage.RenderView() method we selected above.

image

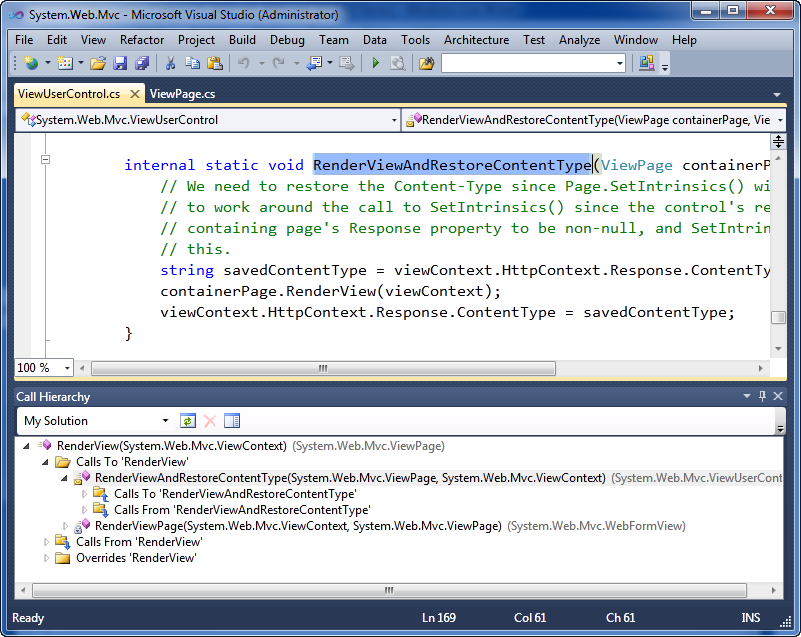
We can then optionally drill down hierarchically into the first “RenderViewAndRestoreContentType” method to see who in-turn calls it:

image

For virtual methods/properties you can also use the call hierarchy window to see what types sub-class and override them.

Double clicking any of the members within the “Call Hierarchy” window will open the appropriate source file and take you immediately to that source location:

image

This allows you to quickly navigate throughout a code-base and better understand the relationships between classes and methods as you code.

Highlighted References

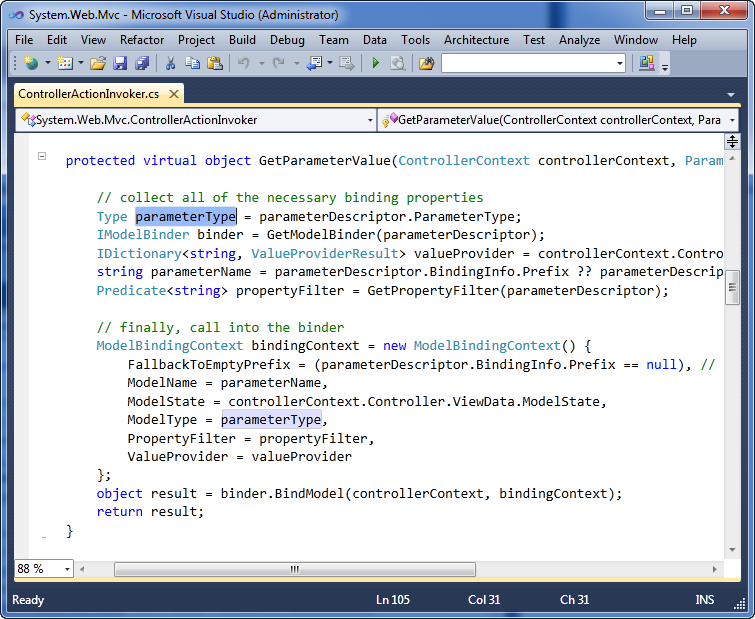
With VS 2010, when you select or highlight a variable / parameter / field declaration within the code-editor, all subsequent usages of it are now automatically highlighted for you within the editor. This makes it easy to quickly identify where and how a variable or parameter is being used.

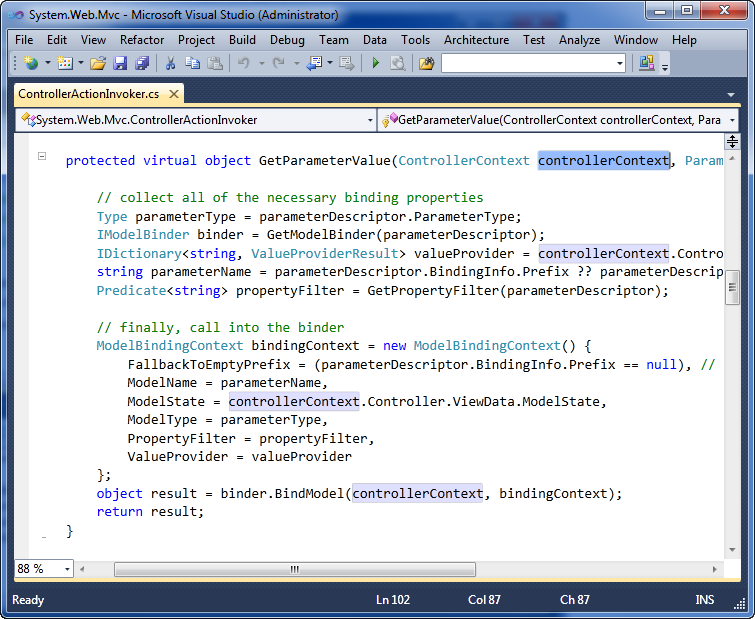
For example, when we select the “controllerContext” parameter passed to the ControllerActionInvoker.GetParameterValue() method in the editor below, notice how the 4 usages of it within that method are also now automatically highlighted:

image

If I select a local variable within the method, all the places it is used are also now automatically highlighted:

image

If multiple usages are highlighted, you can cycle through them using the (Ctrl-Shift-up arrow) and (Ctrl-Shift-Down arrow) keystrokes to quickly move the cursor to the previous or next highlighted symbol.

Summary

The new VS 2010 text editor makes it easy to quickly search, navigate and explore code within a project or solution. The performance of these operations is really fast (even with a large code-base) and are kept up to date as you work on the project and make changes to it. The end result enables you to be much more productive.
Thursday, March 25, 2010

Multi-Monitor Support (VS 2010 and .NET 4 Series)

This is the fourth in a series of blog posts I’m doing on the upcoming VS 2010 and .NET 4 release.

Today’s post covers one of the general IDE improvements that I know a lot of people are already eagerly looking forward to with VS 2010 – multiple-monitor support.

Using Multiple Monitors

VS 2008 hosts all documents/files/designers within a single top-level window – which unfortunately means that you can’t partition the IDE across multiple monitors.

VS 2010 addresses this by now allowing editors, designers and tool-windows to be moved outside the top-level window and positioned anywhere you want, and on any monitor on your system. This allows you to significantly improve your use of screen real-estate, and optimize your overall development workflow.

Taking advantage of the multi-monitor feature is really easy to-do. Simply click on a document tab or tool-window and drag it to either a new location within the top-level IDE window – or outside of the IDE to any location on any monitor you want:

step2

You can later drag the document/window back into the main window if you want to re-dock it (or right click and choose the re-dock option).

Visual Studio remembers the last screen position of documents when saved – which means that you can close projects and re-open them and have the layout automatically startup where you last saved it.

Some Multi-Monitor Scenarios

Below are some screen-shots of a few of the scenarios multi-monitor enables (obviously there are many more I’m not covering). Pretend each window in the screenshots below is on a different monitor to get the full idea…

Code source file support:

Demonstrates how code files can be split up across multiple monitors. Below I’ve kept a .aspx file in the main IDE window and then moved a code-behind file and a separate class file to a separate screen:

step3

Tool window support:

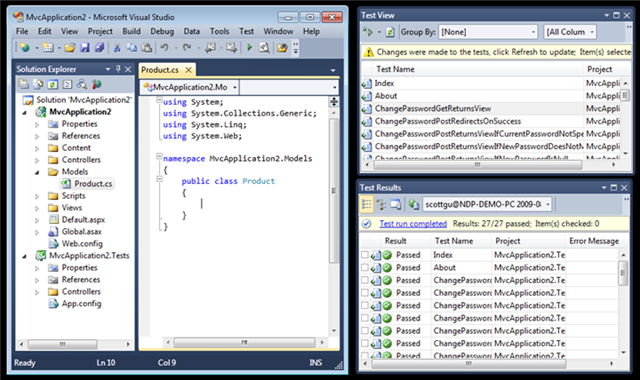
Demonstrates how any tool window/pane within VS10 can be split across multiple monitors. Below I’ve moved the test runner tool windows to a separate screen:

step5

Designer support:

Demonstrates how a designer within VS can be split across multiple monitors. Below I’ve moved the WPF/Silverlight WYSWIYG designer and the property grid to a separate screen (the code behind file is still in the main window). Note how the VS10 property grid now supports inline color editors, databinding, styles, brushes, and a whole bunch more for WPF and Silverlight applications (I’ll cover this in later blog posts):

step6

Summary

If you work on a system that has multiple monitors connected to it, I think you are going to find the new multi-monitor support within VS10 a big productivity boost.

Code Optimized Web Development Profile (VS 2010 and .NET 4.0 Series)

This is the fifth in a series of blog posts I’m doing on the upcoming VS 2010 and .NET 4 release.

Today’s post covers a new “Web Development (Code Optimized)” profile option we are introducing with VS 2010 that allows you to optionally configure Visual Studio to run in an IDE layout mode that hides the WYSIWYG web designer and instead optimizes around a rich “source editing focused” tooling experience.

VS 2010 Web Profiles

When you first run VS 2010 it prompts you to select an IDE profile to use. The profile you select will configure how tool windows are displayed/docked in the IDE by default and set the default keyboard shortcuts. You can then customize any of these settings by using the Tools->Options menu within the IDE and then override/change them. You can also later reset your profile and pick a different one by choosing the Tools->Import and Export Settings menu command.

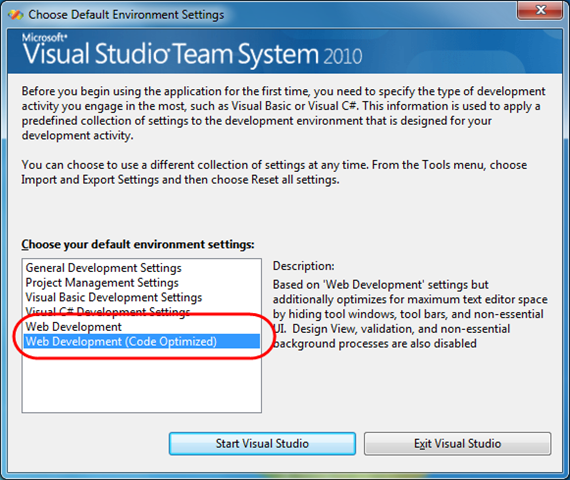
One of the things you’ll notice when you run VS 2010 Beta2 for the first time is the inclusion of two “Web Development” profiles in the list of options:

0 Choose Default Environment Settings

The first “Web Development” profile option is an evolution of the existing web development profile option from VS 2008 (with some nice improvements that help improve screen real estate usage with VS 2010). It also allows you to take advantage of all the great WYSIWYG HTML and ASP.NET Page designer improvements we’ve done with the VS 2010 release (I’ll cover these in more detail in later blog posts in this series).

The second “Web Development (Code Optimized)” profile option is a new profile we are introducing with VS 2010 that is optimized for web developers who do not want to use a WYSIWYG designer when doing their web development, and who prefer a “source only” editing experience when working on pages. This IDE profile option hides the WYWISYG page designer tabs, and configures a default IDE layout that maximizes the amount of code that is displayed on the screen (with a minimum of toolbars and tool windows). It still provides a full intellisense/debugging and source editor experience for pages.

Comparing the VS 2010 Web Development Profiles

You can get a sense of the difference between the two profiles by comparing screen-shots of the Visual Studio IDE layout immediately after the two different “Web Development” profiles are applied:

Screenshot of the “Web Development” Profile:

The layout below demonstrates the default IDE layout (at a 750x650 monitor resolution) when the standard “Web Development” profile is applied. This profile is an evolution of the existing “Web Development” profile in VS 2008 and exposes design/split/source tabs within the document window of any HTML or ASP.NET page:

1 Old Profile Small IDE

Screenshot of the “Web Development (Code Optimized)” Profile:

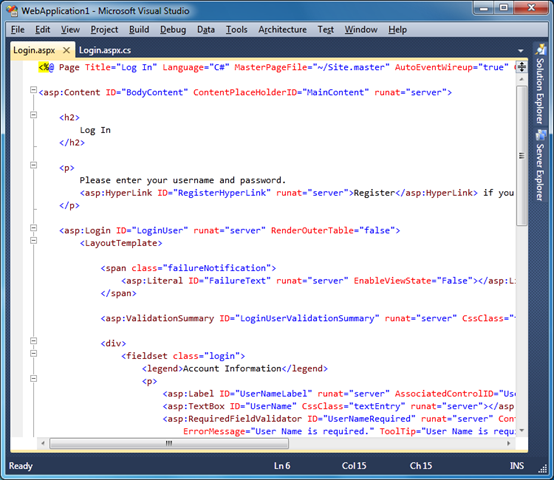
The screen-shot below demonstrates the default IDE layout (at a 750x650 monitor resolution) when the new “Web Development (Code Optimized)” profile is applied. As you can see, the profile optimizes the screen real estate around displaying and editing code on the screen, hides all toolbars by default, and disables and hides the designer tabs within the document windows of HTML and ASP.NET pages:

2 New Profile Small IDE

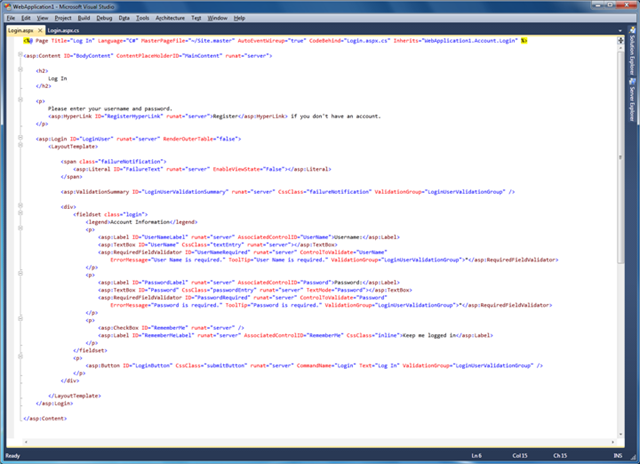
Below is a screen-shot of the “code optimized” profile at a larger monitor resolution:

2 New Profile Full IDE Single File

Mixing and Matching Features

All of the different features used in both the standard “Web Development” profile and the “Web Development (code optimized)” profile are exposed via Visual Studio’s Tools->Options configuration dialog. This means that you can start with any of the VS profiles (including the General, VB and C# profiles) and turn on or off individual features to customize the IDE layout and editing experience however you want it to be.

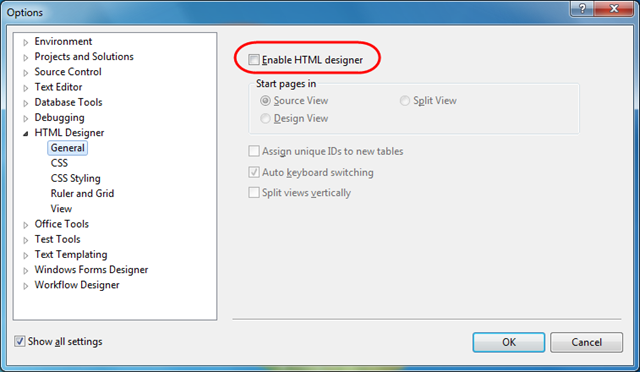
For example: below you can see the Tools->Options dialog checkbox to enable or disable the HTML designer (which will configure whether the Design/Split/Source tabs are shown at the bottom of each page):

0 Tools Options HTML Designer

This gives you the flexibility to customize your development experience however you want and create a personalized tooling experience optimized for you and your preferred way of doing development.

The two web development profiles that ship in the box provide two good preconfigured starting points that we think offer a nice set of defaults for a large set of the web developers out there. You can easily choose to start with whichever one feels best to you, and optionally configure them further however you want.

Summary

We are offering the new profile simply as an option for those who prefer a source-focused web development experience. The WYSIWYG HTML/ASP.NET designer continues to be enabled by default with all the other VS 2010 profiles (just like it does with VS 2008), and we have also made a lot of improvements to it with the VS 2010 release (I’ll blog more details about these in later posts). So don’t worry – the WYSIWYG designer definitely isn’t going away, and will continue to be enhanced and improved with each release.

We think the new “Web Development (Code Optimized)” profile, though, is a nice new option for developers who prefer a “source editing focused” web development experience, and who do not use the WYSIWYG designer. The profile option provides an easy way for them to hide the designer (along with its associated tool windows and toolbars) from the IDE layout and instead use a source-focused web development experience.

ASP.NET, HTML, JavaScript Snippet Support (VS 2010 and .NET 4.0 Series)

This is the sixth in a series of blog posts I’m doing on the upcoming VS 2010 and .NET 4 release.

Today’s post covers another useful improvement in VS 2010 – HTML/ASP.NET/JavaScript snippet support. Snippets allow you to be more productive within source view by allowing you to create chunks of code and markup that you can quickly apply and use in your application with a minimum of character typing.

Visual Studio has supported the concept of “snippets” for VB and C# in previous releases – but not for HTML, ASP.NET markup and JavaScript. With VS 2010 we now support snippets for these content types as well.

Using ASP.NET Snippets

Let’s walkthrough how we can use snippets to quickly implement a common security scenario. Specifically, we’ll implement the functionality necessary to display either a “[ Login ]” link or a “[ Welcome UserName ]” message at the the top right of a site depending on whether or not the user is logged in:

step1

The above functionality is automatically added for you when you create a project using the new ASP.NET Project Starter Template in VS 2010. For the purpose of this walkthrough, though, we’ll assume we are starting with a blank master page and will build it entirely from scratch.

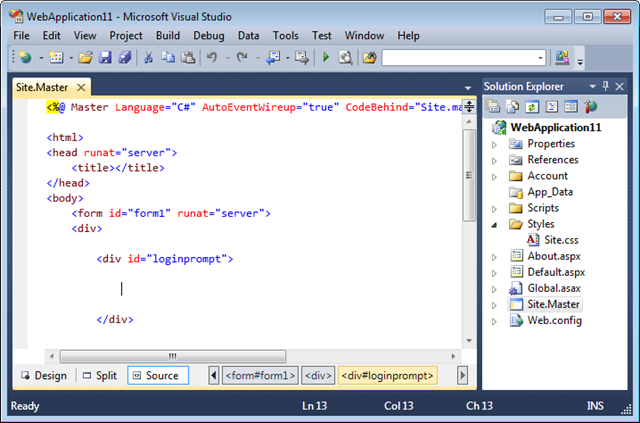
We’ll start by adding a standard

element to a master page, and then position our cursor within it:

step2

We are going to use the built-in control to help implement our scenario. The control is a templated control (first introduced with ASP.NET 2.0) that allows us to easily switch between “Anonymous” and “LoggedIn” templates that automatically display depending on whether the user is authenticated. Rather than type the markup manually, we’ll instead use the new snippet support in VS 2010.

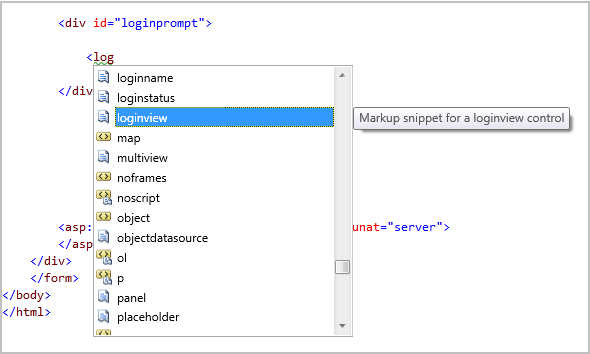
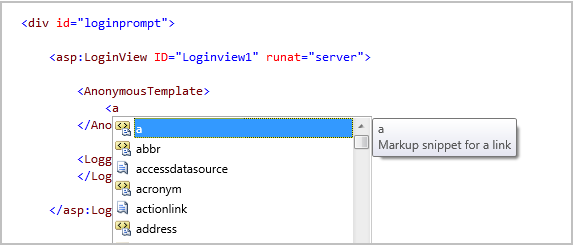
Typing in “

step3

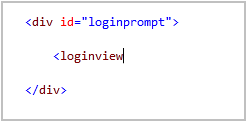
We’ll select the built-in “loginview” code snippet from the above list and hit the “tab” key to complete it:

step4

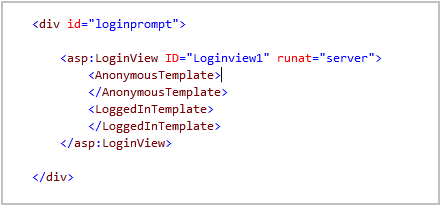
Now that we’ve selected the snippet we want to use, we can hit the “tab” key again to execute the snippet – which will cause it to immediately replace the snippet name with the markup below. Notice below the snippet added a new control for us and automatically defined the two most commonly used templates on it. We were able to implement that all with just 6 keystrokes (4 keystrokes to type “

step5

We’ll now implement the “AnonymousTemplate”.

Typing in “

step6

We’ll select the built-in “a” code snippet from the above list and hit the “tab” key to complete it. When we hit tab again it will execute the snippet – which will cause it to replace the snippet name with the markup below:

step7

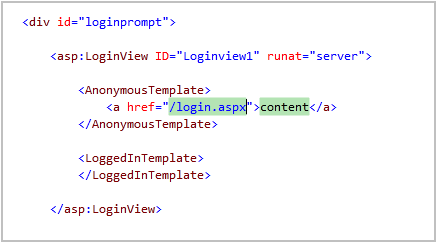
The “href” attribute attribute value and the inner content of the element above are highlighted with a green background color. This indicates that these values are replaceable parameters and that we can automatically tab between them when filling them out – avoiding the need to use the cursor keys or touch the mouse (making things much faster).

Without having to move our cursor or mouse, we can begin typing the login page URL we want to send users to if they are not authenticated on the site:

step8

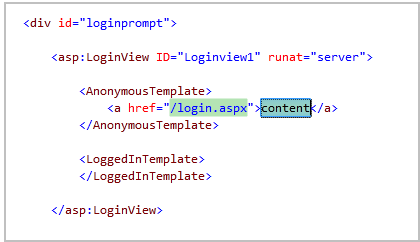
When done, we can hit the “tab” key and VS will automatically highlight the second content parameter in the editor for us (no manual cursor movement or mouse action required):

step9

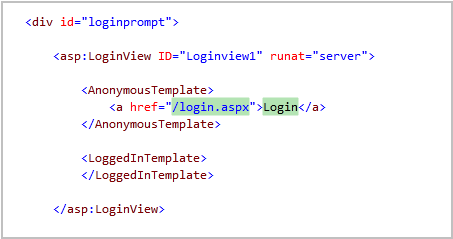
We can then type the text we want displayed (again without having to move the mouse or touch a cursor key):

step10

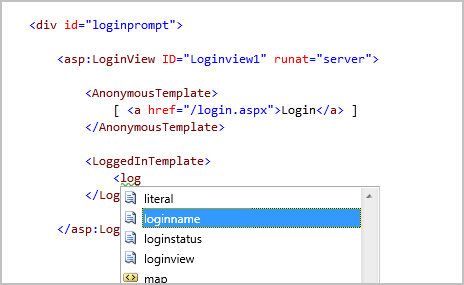
Once done with the “” we can move onto the "”. We’ll type “

step11

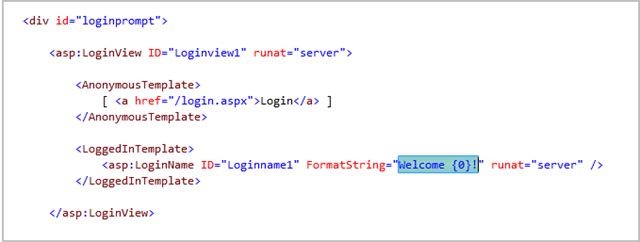
When we hit tab it will execute the snippet – which will cause it to replace the snippet with the markup below:

step12

The “FormatString” property value above was automatically populated for us with a default welcome text message. The value is also automatically highlighted in case we want to change it (without having to move the mouse or cursor keys). For this sample we’ll just keep the default text.

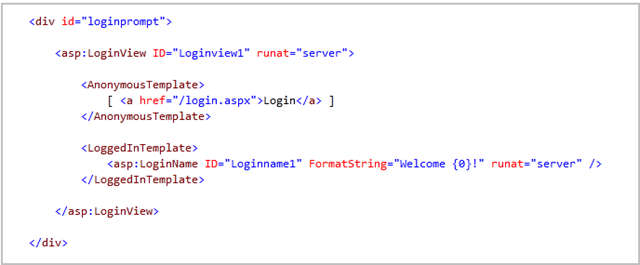
Our final markup then looks like below:

step13

When we run our application the above markup will display a “[Login]” link when we aren’t authenticated:

step19

When we are logged in we’ll see a welcome string like below:

step15

The total number of key strokes to implement this entire scenario is less than 15% of what we would previously have had to type. Typing fast, I found I could implement the entire scenario in less than 15 seconds :-)

ASP.NET MVC Snippets

Built-in snippets are available for all ASP.NET controls and HTML markup elements.

Built-in snippets are also available for common ASP.NET MVC view scenarios, and for the built-in ASP.NET MVC HTML helpers.

For example, we can type “

step16

When we complete it and hit the “tab” key the snippet will execute – which will cause it to replace the snippet name with the markup below:

step17

Notice that the “linktext” and “actionname” values are marked as snippet parameters – which means we can easily replace them without having to use the cursor keys or touch the mouse. The first linktext parameter value is selected by default – which means we can just type to immediately replace the value, then hit tab to immediately select and replace the second actionname parameter:

step18

Custom Snippets

Visual Studio 2010 will include more than 200 built-in snippets that you can immediately use when you install the product.

What is really nice is that you are not limited to only using the built-in snippets. You can also easily create your own snippets (complete with replaceable parameters) and both import them into VS 2010, as well as easily share them with other developers. This makes it easy for you to quickly automate your own common tasks.

This article describes the snippet support that already exists in VS 2008, and provides a little more context on how to create and manage custom snippets.

Summary

Snippets are a useful feature that enable you to reduce keystrokes within the editor, and allow you to complete scenarios and tasks much faster. Having snippets now enabled in not just VB and C#, but also in HTML, ASP.NET and JavaScript files, makes this capability even more useful – and can make you even more productive.
VS 2010 Code Intellisense Improvements (VS 2010 and .NET 4.0 Series)

This is the tenth in a series of blog posts I’m doing on the upcoming VS 2010 and .NET 4 release.
In today’s blog post I’m going to cover a small but really nice improvement to code intellisense with VS 2010 – which is its ability to better filter type and member code completion. This enables you to more easily find and use APIs when writing code.

Code Intellisense with VS 2008

To help illustrate this intellisense improvements coming with VS 2010, let’s start by doing a simple scenario in VS 2008 where we want to write some code to enable an editing scenario with a GridView control.

We might start off by typing “GridView1.Edit” to bring up intellisense to see what Edit members are available on the control. Doing this with VS 2008 brings up the intellisense drop-down and filters the current location in the dropdown to the members that start with the word “Edit”:

image

This is great if the method/property/event we want to work with starts with “Edit” – but doesn’t really help us if the “Edit” member we are looking for starts with something else (for example: the “RowEditing” event or the “SetEditRow()” helper method). We have to either manually scroll up and down looking for the other edit members, or pull up the object browser or help system to find them.

Code Intellisense with VS 2010

Let’s now try out the same scenario with VS 2010. When we type “GridView1.Edit” within VS 2010 we’ll find that the EditIndex property is still highlighted by default. But the intellisense list has also been filtered so that it enables you to quickly locate all other members that have the word “Edit” anywhere in them:

image

This allows us to quickly see all of the edit related methods/properties/events and more quickly find what we are looking for.

Searching for Keywords

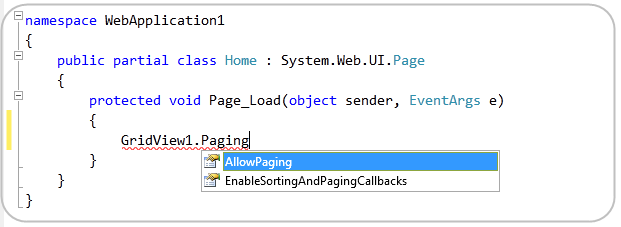
This new intellisense filtering feature of VS 2010 is useful for searching for any member – regardless of what word it starts with. For example, if we want to enable paging on a datagrid and can’t remember how to-do it, we could just type “GridView1.Paging” and it would automatically filter out everything but members that have the word paging. Notice below how no members on the GridView class actually start with the word “Paging” – but I am still finding the two members that do have paging in them later in their names:

image

Searching for Types

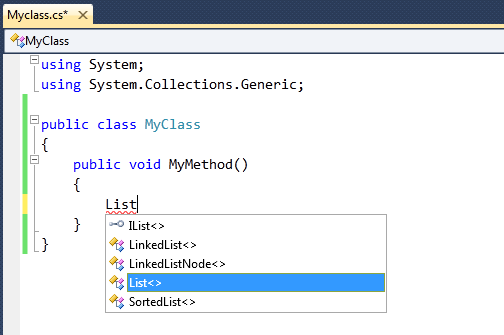
This new intellisense filtering capability of VS 2010 is also useful for quickly finding classes and types. For example, when we type “List” to declare a variable, the editor will provide automatic filtering to show all types that have the word “List” somewhere in them (including IList<> and SortedList<> – which do not start with List):

image

This makes it much easier to find type names you can’t entirely remember – without having to resort to searching through the object browser and/or using help documentation.

Pascal Case Intellisense

The .NET Framework naming guidelines specify that type and member names should be “Pascal Cased” by default. This means that each word in a type or member should start with a capitalized letter (for example: PageIndexChanged).

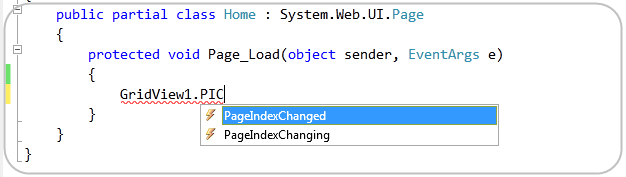
VS 2010’s intellisense filtering support now enables you to take advantage of this to quickly find and filter methods based on their pascal naming pattern. For example, if we typed “GridView1.PIC” VS 2010 would filter to show us the members that have PIC in their name, as well as those members which have a pascal cased name where the word segments start with that letter sequence:

image

Notice above how PIC caused both “PageIndexChanged” and “PageIndexChanging” to show up. This saves us a few keystrokes when resolving either member or type names.

Summary

I think you’ll find that the new intellisense filtering approach in VS 2010 makes it easier to quickly find and use classes and members when writing code. You can take advantage of it with both VB and C#.